Cluster
Architecture
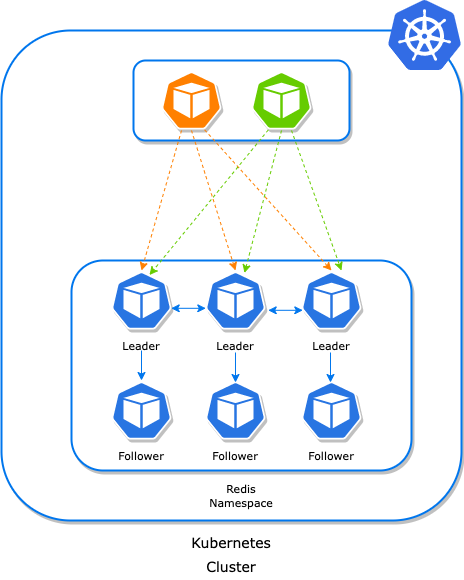
A Redis cluster is simply a data sharding strategy. It automatically partitions data across multiple Redis nodes. It is an advanced feature of Redis which achieves distributed storage and prevents a single point of failure.
In case of any redis node failure, a follower pod will automatically promote as the leader and whenever the old follower node will come back online, it will start acting as a follower. There are a minimum of 3 nodes required to build a Redis-sharded cluster with leader-only architecture. If we include followers as well, there will be at least 6 pods/processes of Redis.
Helm Installation
For redis cluster setup we can use helm command with the reference of cluster helm chart and additional properties:
$ helm install redis-cluster ot-helm/redis-cluster \
  --set redisCluster.clusterSize=3 --namespace ot-operators
...
Release "redis-cluster" does not exist. Installing it now.
NAME:          redis-cluster
LAST DEPLOYED: Sun May  2 16:11:38 2021
NAMESPACE:     ot-operators
STATUS:        deployed
REVISION:      1
TEST SUITE:    None
Verify the cluster by checking the pod status of leader and follower pods.
$ kubectl get pods -n ot-operators
...
NAME                                 READY   STATUS    RESTARTS   AGE
redis-cluster-follower-0             1/1     Running   0          149m
redis-cluster-follower-1             1/1     Running   0          150m
redis-cluster-follower-2             1/1     Running   0          151m
redis-cluster-leader-0               1/1     Running   0          149m
redis-cluster-leader-1               1/1     Running   0          150m
redis-cluster-leader-2               1/1     Running   0          151m
If all the pods are in the running state of leader and follower Statefulsets, then we can check the health of the redis cluster by using redis-cli.
$ kubectl exec -it redis-cluster-leader-0 -n ot-operators -- redis-cli -a Opstree@1234 cluster nodes
...
Defaulting container name to redis-leader.
Use 'kubectl describe pod/redis-leader-0 -n ot-operators' to see all of the containers in this pod.
Warning: Using a password with '-a' or '-u' option on the command line interface may not be safe.
528438a759cee4528c3071d17d75b27b0818555d 10.42.0.219:6379@16379 myself,master - 0 1619952294000 1 connected 0-5460
8ec7812903b7e046bec2f2a7bce4a9ccadfa4188 10.42.0.221:6379@16379 slave d0ff3892d2eba0b2707199cb5df57adbba214bcd 0 1619952297241 3 connected
60f932272322bafbd8c3e16328d26af676aeb8d6 10.42.0.220:6379@16379 slave 6e80da4902802ebffa94cbac9b7d98e9fd74121f 0 1619952297000 2 connected
6e80da4902802ebffa94cbac9b7d98e9fd74121f 10.42.2.178:6379@16379 master - 0 1619952297000 2 connected 5461-10922
d0ff3892d2eba0b2707199cb5df57adbba214bcd 10.42.1.178:6379@16379 master - 0 1619952298245 3 connected 10923-16383
c2b74bd2a360068db01dfc8f00b8d0b012e21215 10.42.1.177:6379@16379 slave 528438a759cee4528c3071d17d75b27b0818555d 0 1619952297000 1 connected
YAML Installation
Examples folder has different types of manifests for different scenarios and features. There are these YAML examples present in this directory:
- additional_config
- advance_config
- affinity
- disruption_budget
- external_service
- password_protected
- private_registry
- probes
- redis_monitoring
- tls_enabled
- upgrade_strategy
A sample manifest for deploying redis cluster:
---
apiVersion: redis.redis.opstreelabs.in/v1beta2
kind: RedisCluster
metadata:
  name: redis-cluster
spec:
  clusterSize: 3
  clusterVersion: v7
  podSecurityContext:
    runAsUser: 1000
    fsGroup: 1000
  persistenceEnabled: true
  kubernetesConfig:
    image: quay.io/opstree/redis:v7.0.15
    imagePullPolicy: Always
  storage:
    volumeClaimTemplate:
      spec:
        accessModes: ["ReadWriteOnce"]
        resources:
          requests:
            storage: 1Gi
    nodeConfVolume: true
    nodeConfVolumeClaimTemplate:
      spec:
        accessModes: ["ReadWriteOnce"]
        resources:
          requests:
            storage: 1Gi
The yaml manifest can easily get applied by using kubectl.
$ kubectl apply -f cluster.yaml